
Before the Booth: Getting Started
From first contact to finalized Design
Most bicycles that come to VéloColour for paint fit into two categories: Restorations and Custom Paint. (We do also offer a one-colour special and touch ups on paint chips and wear; however, we are focusing on full projects for this post).
This is a behind-the-scenes look at the design process for a bicycle – modern or vintage – that involves a creative approach to the paint scheme. We call these projects “Custom Bikes” to distinguish them from classic restorations, even though the bike in question could be a 1960s steel-frame road bike.

A pile of past design mock ups.
A lot of people ask “what is the design process? How do I get the ideas out of my brain and onto my bicycle?”
Though we paint countless brands and eras of bicycles, and create a wide variety of paint designs and styles, pretty much every project goes through the same four-step process:
1. First contact
2. Booking into the queue
3. Design time
4. Final details and frame delivery
Step 1: First contact
People often reach out to us with an idea, but don’t really know how to get started, how much their idea might cost, or how the process works. The best way to start is by sending us an e-mail. We often have 60 or more projects on the go at any given time so e-mail is our favourite way of discussing paint work – it makes it really easy to keep track of the details, ideas and images of each customer throughout the life of the project.
Whenever we begin a conversation, we always start by asking customers for photos of their current bicycle and a general idea of what they want done.
Why do we want images of your current bike? We gather a lot of information from photos, including details our customers may not realize affect the cost of the job. For example, some carbon bikes have a lot of paint transitions and graphics which may increase the prep time. Pictures help us clock other details that may affect the scope of work too — like areas with heavy rust, chrome to be masked, or cable guides that could affect the graphic placement.
For local drop offs, we want to know whether the frame is coming to us disassembled, or if we are providing mechanical services to disassemble before paint and to rebuild after we’re finished.
All of these details affect the process and cost of the project.

A raw titanium frame that’s just come into the shop.
Using the customer’s photos and initial design ideas, we create an estimate based on our understanding of the project’s parameters and details. This is a great starting point to see if we’re within a comfortable budget range. Details can add up quickly! From here we can either move forward or look for ways to meet the customers budgetary concerns. If the cost is more than expected, we can identify how best to simplify the design to both meet the budget and capture the essence of these initial design ideas.
We believe that a good designer’s job is to be creative, and that includes working within a budget!
That being said, some things take the time that they take and there’s no way around that. We will be honest with customers on what is possible. We don’t start to put together any official designs at this point.
At the end of this conversation, we both have a sense of the general design, the work to be done, and a comfortable price range.
Step 2: Booking into the Queue
The next step is to book a spot in our paint queue.
Our lead time for full paint jobs is 10-12 weeks on average, but our peak painting season (winter, when folks stop riding outdoors) can be upwards of 15-18 weeks. The queue booking gets customers a spot in line and acts as a deposit that goes towards the final price. The booking will also include a questionnaire form where you can provide us with some helpful information — like the rear-end spacing on a steel-frame.
We will provide customers who have booked into the queue with a timeline and key dates for their project (like when we will start the design conversation, when we need the frame by, and the expected paint start date) within a week of their booking.

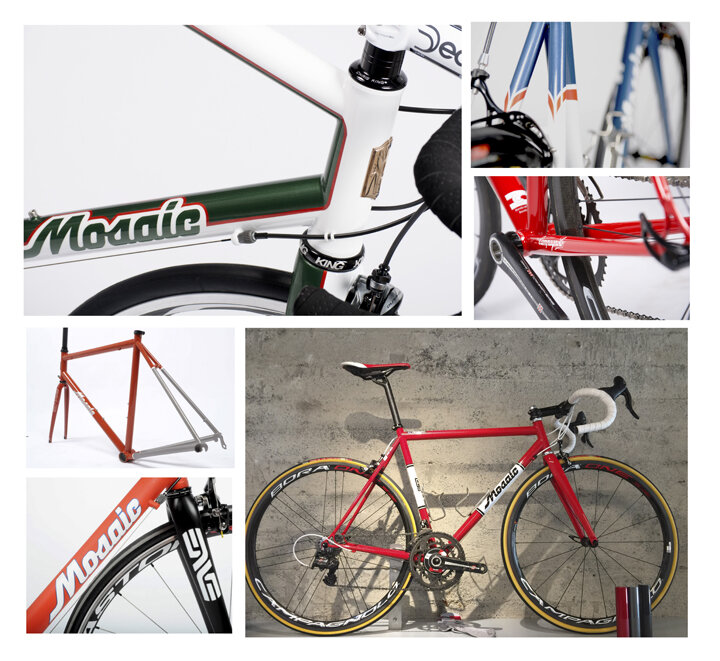
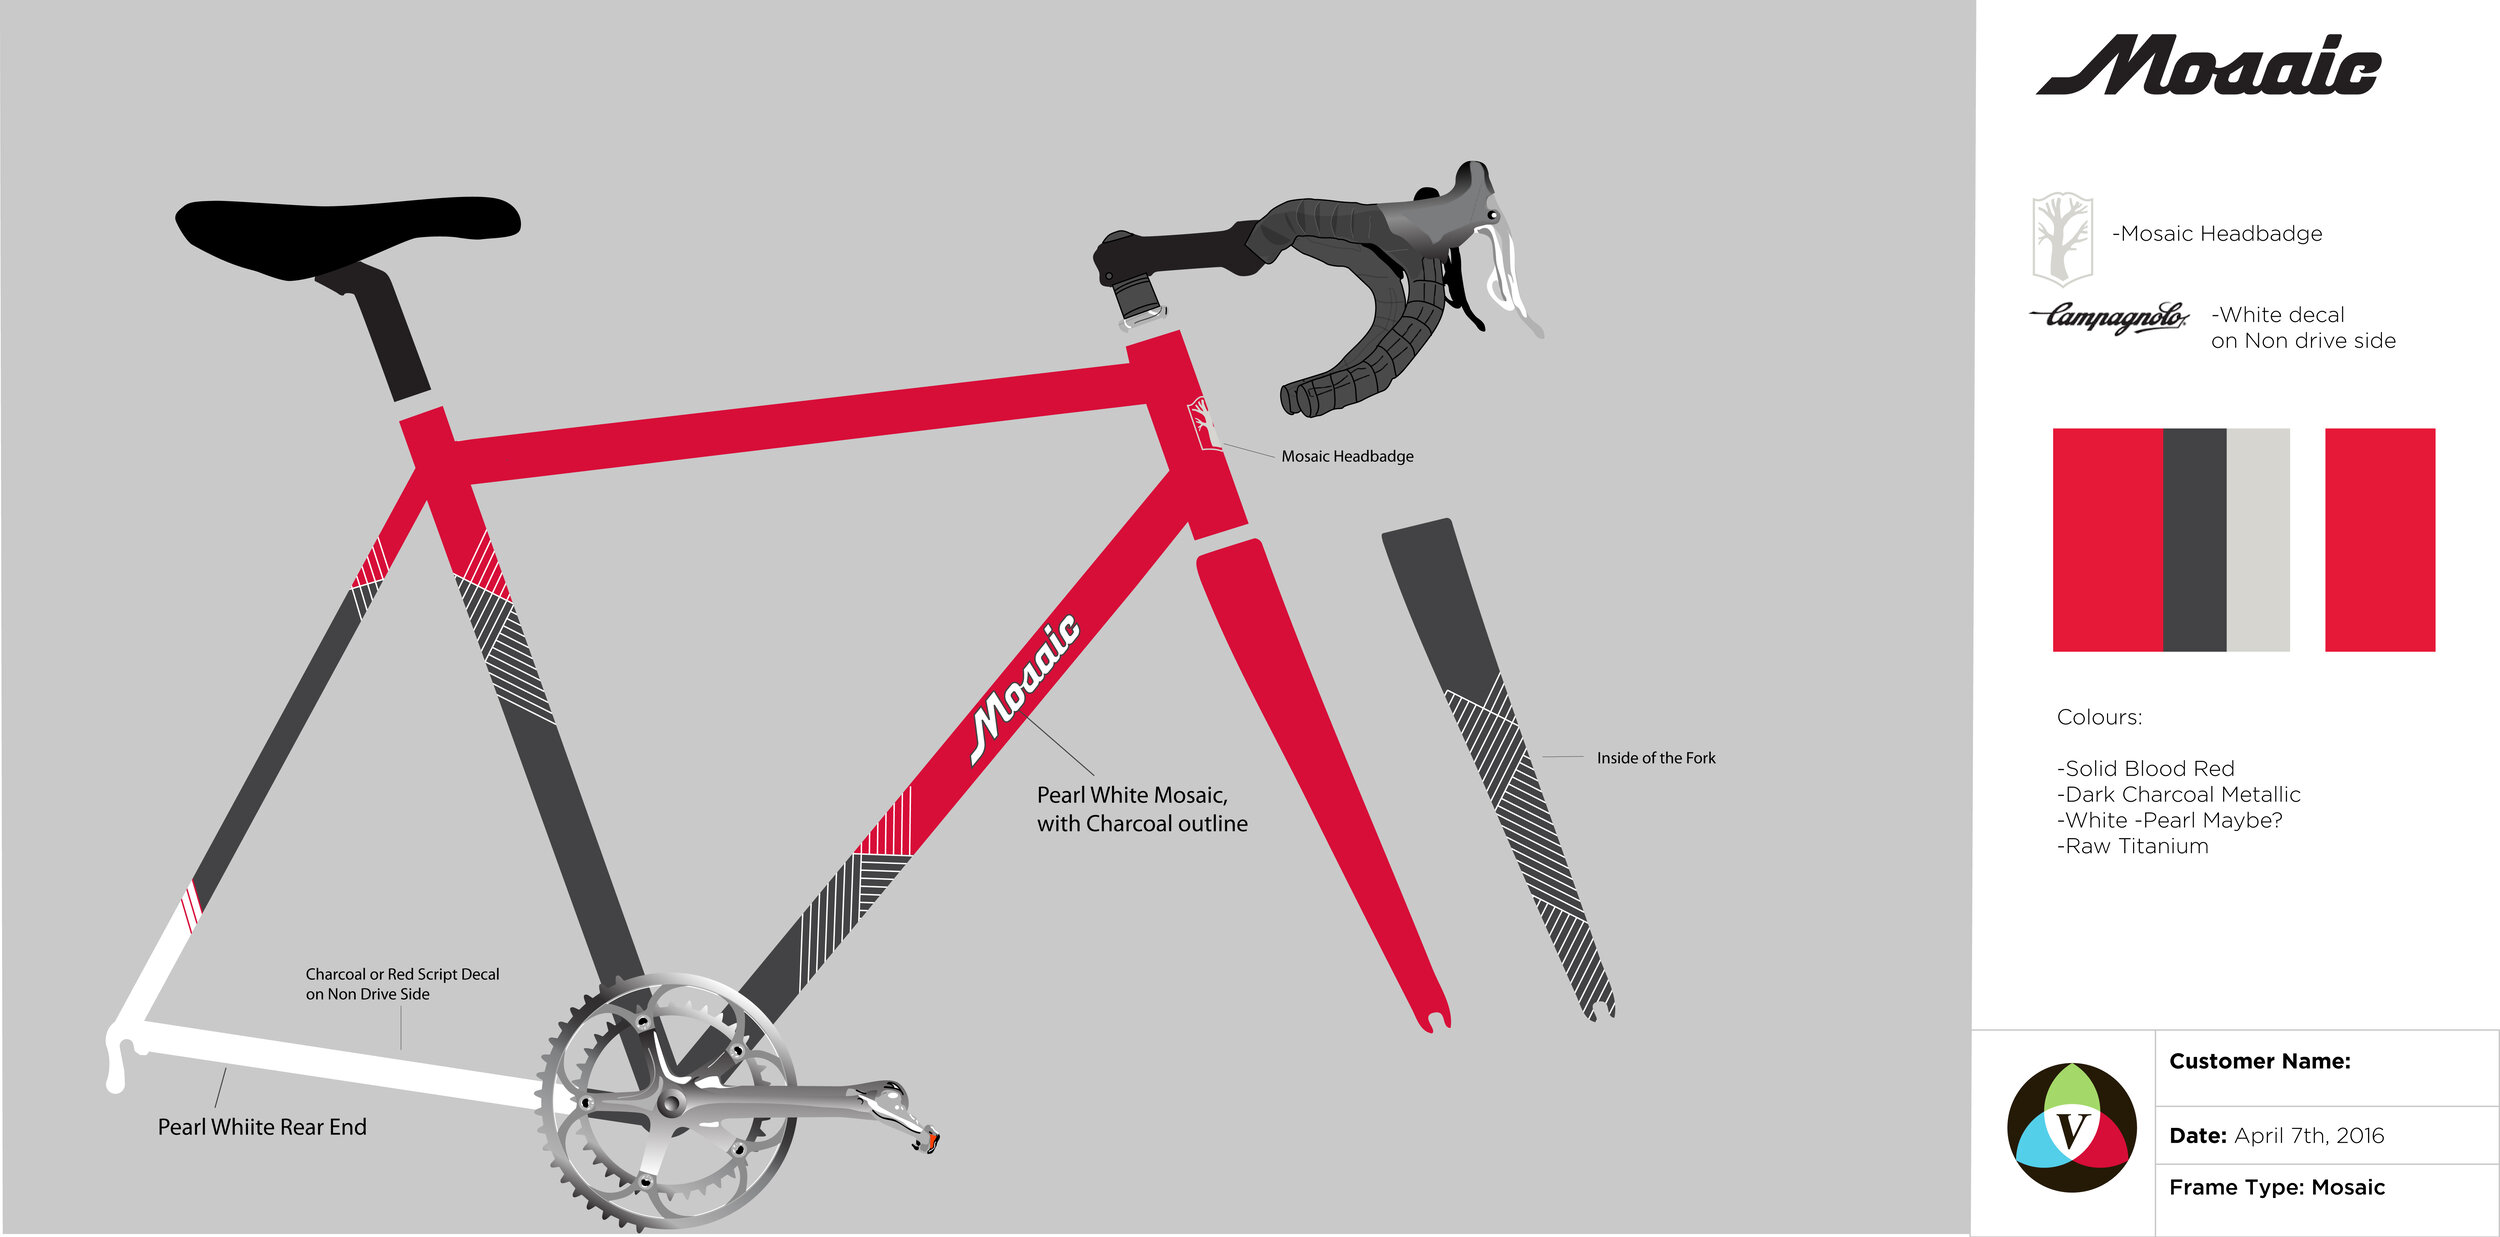
Rear-view of a custom painted Mosaic (more pics to come).
Step 3: Design Time
It’s about six weeks out from the paint date. The time has come to start the design conversation.
We like to have three things prior to starting the design:
1. Your Inspiration!
Bike references are fine, but all kinds of visual inspiration are great! We encourage customers to send us pictures of other things they like – anything from your favourite sunset, wrist watch, painting… you get the point. We can take inspiration from pretty much anything and love seeing all of the different references we get. Sometimes we hear ”just do whatever you think will be awesome”. We can do that too, but we still want some colour references to use as a guide – because hot pink super sparkle is very different from an ocean blue fade.

Custom painted components to match.
2. What parts are getting painted
Most jobs consist of the frame and fork, but we frequently paint the stem, handlebars, and seat post to match. In fact, we sometimes recommend these additions to visually tie the colours and parts together. Then there are a lot of other parts we can paint — frame pumps, carbon cranks, shift levers, head set spacers — we can and have done it all. Whatever you want painted, we need to know so we can incorporate it into your design. We often create and hand-cut custom head badges to accompany our paint — but that’s a whole other blog post.
3. Your Budget
We like to double-check the budget range with you before we dive into creating the design. We can paint anything, it just comes down to the time it will take. There’s no sense in us designing a paint scheme that won’t fit your cost expectations. For customers who are unsure of their budget going in, we can take an initial design and offer three versions representing a range of budgets for you to choose from.
Once we have these three key elements — inspiration, the parts to be painted, and your desired budget — Suzanne puts it all together with a dash of design magic to create an initial design mock up.
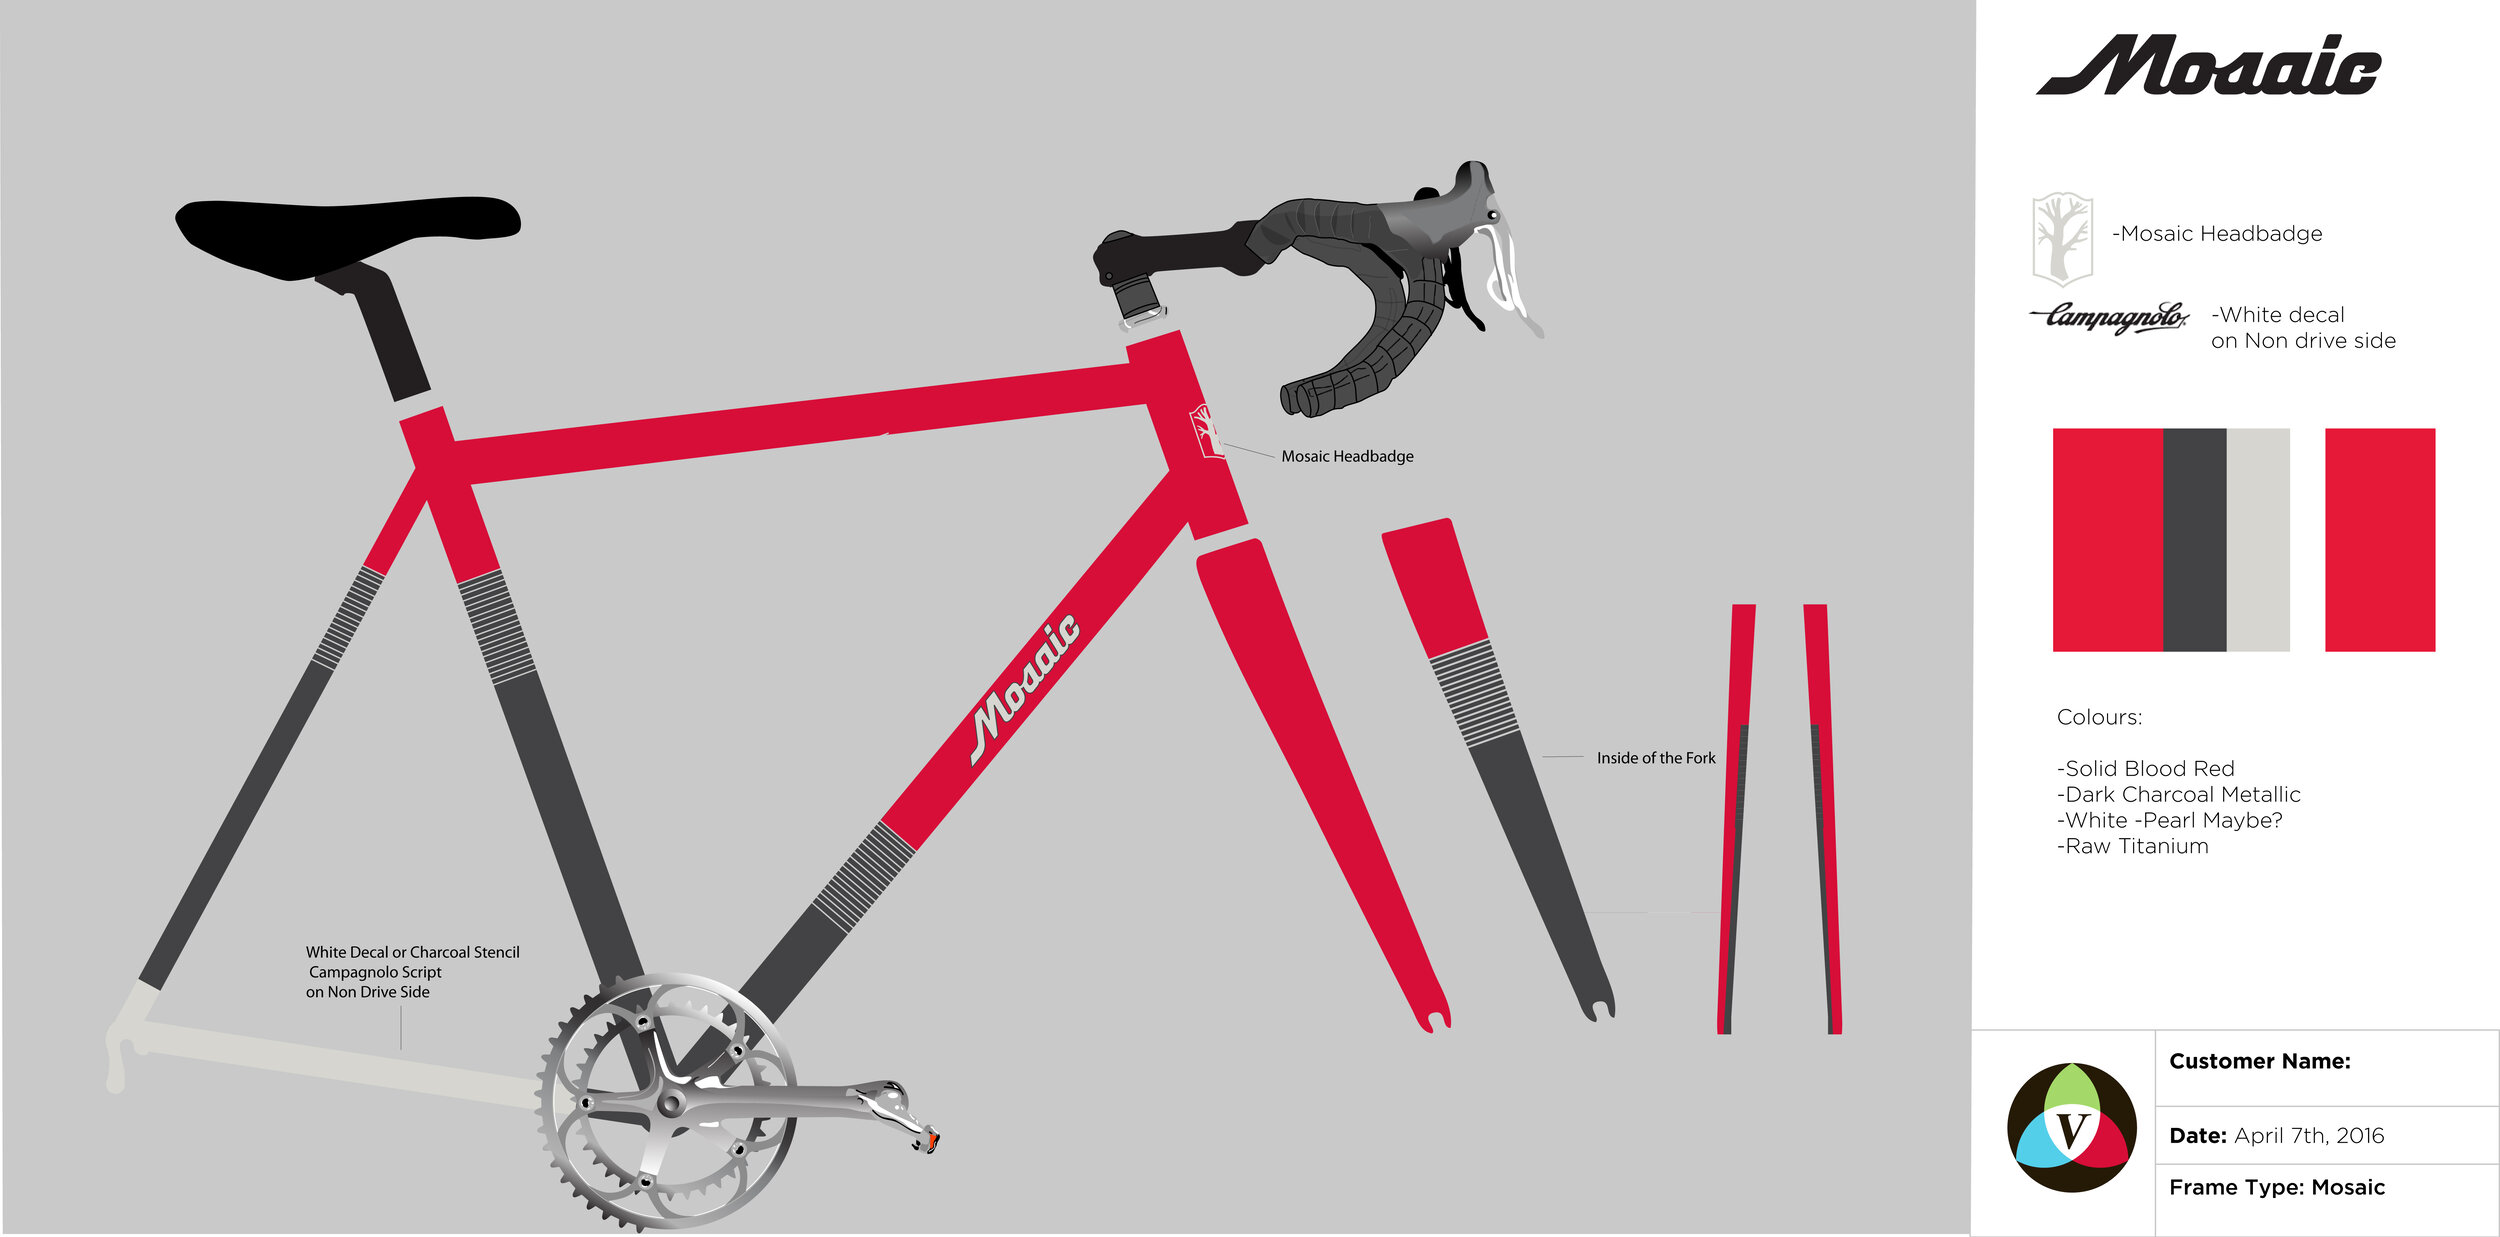
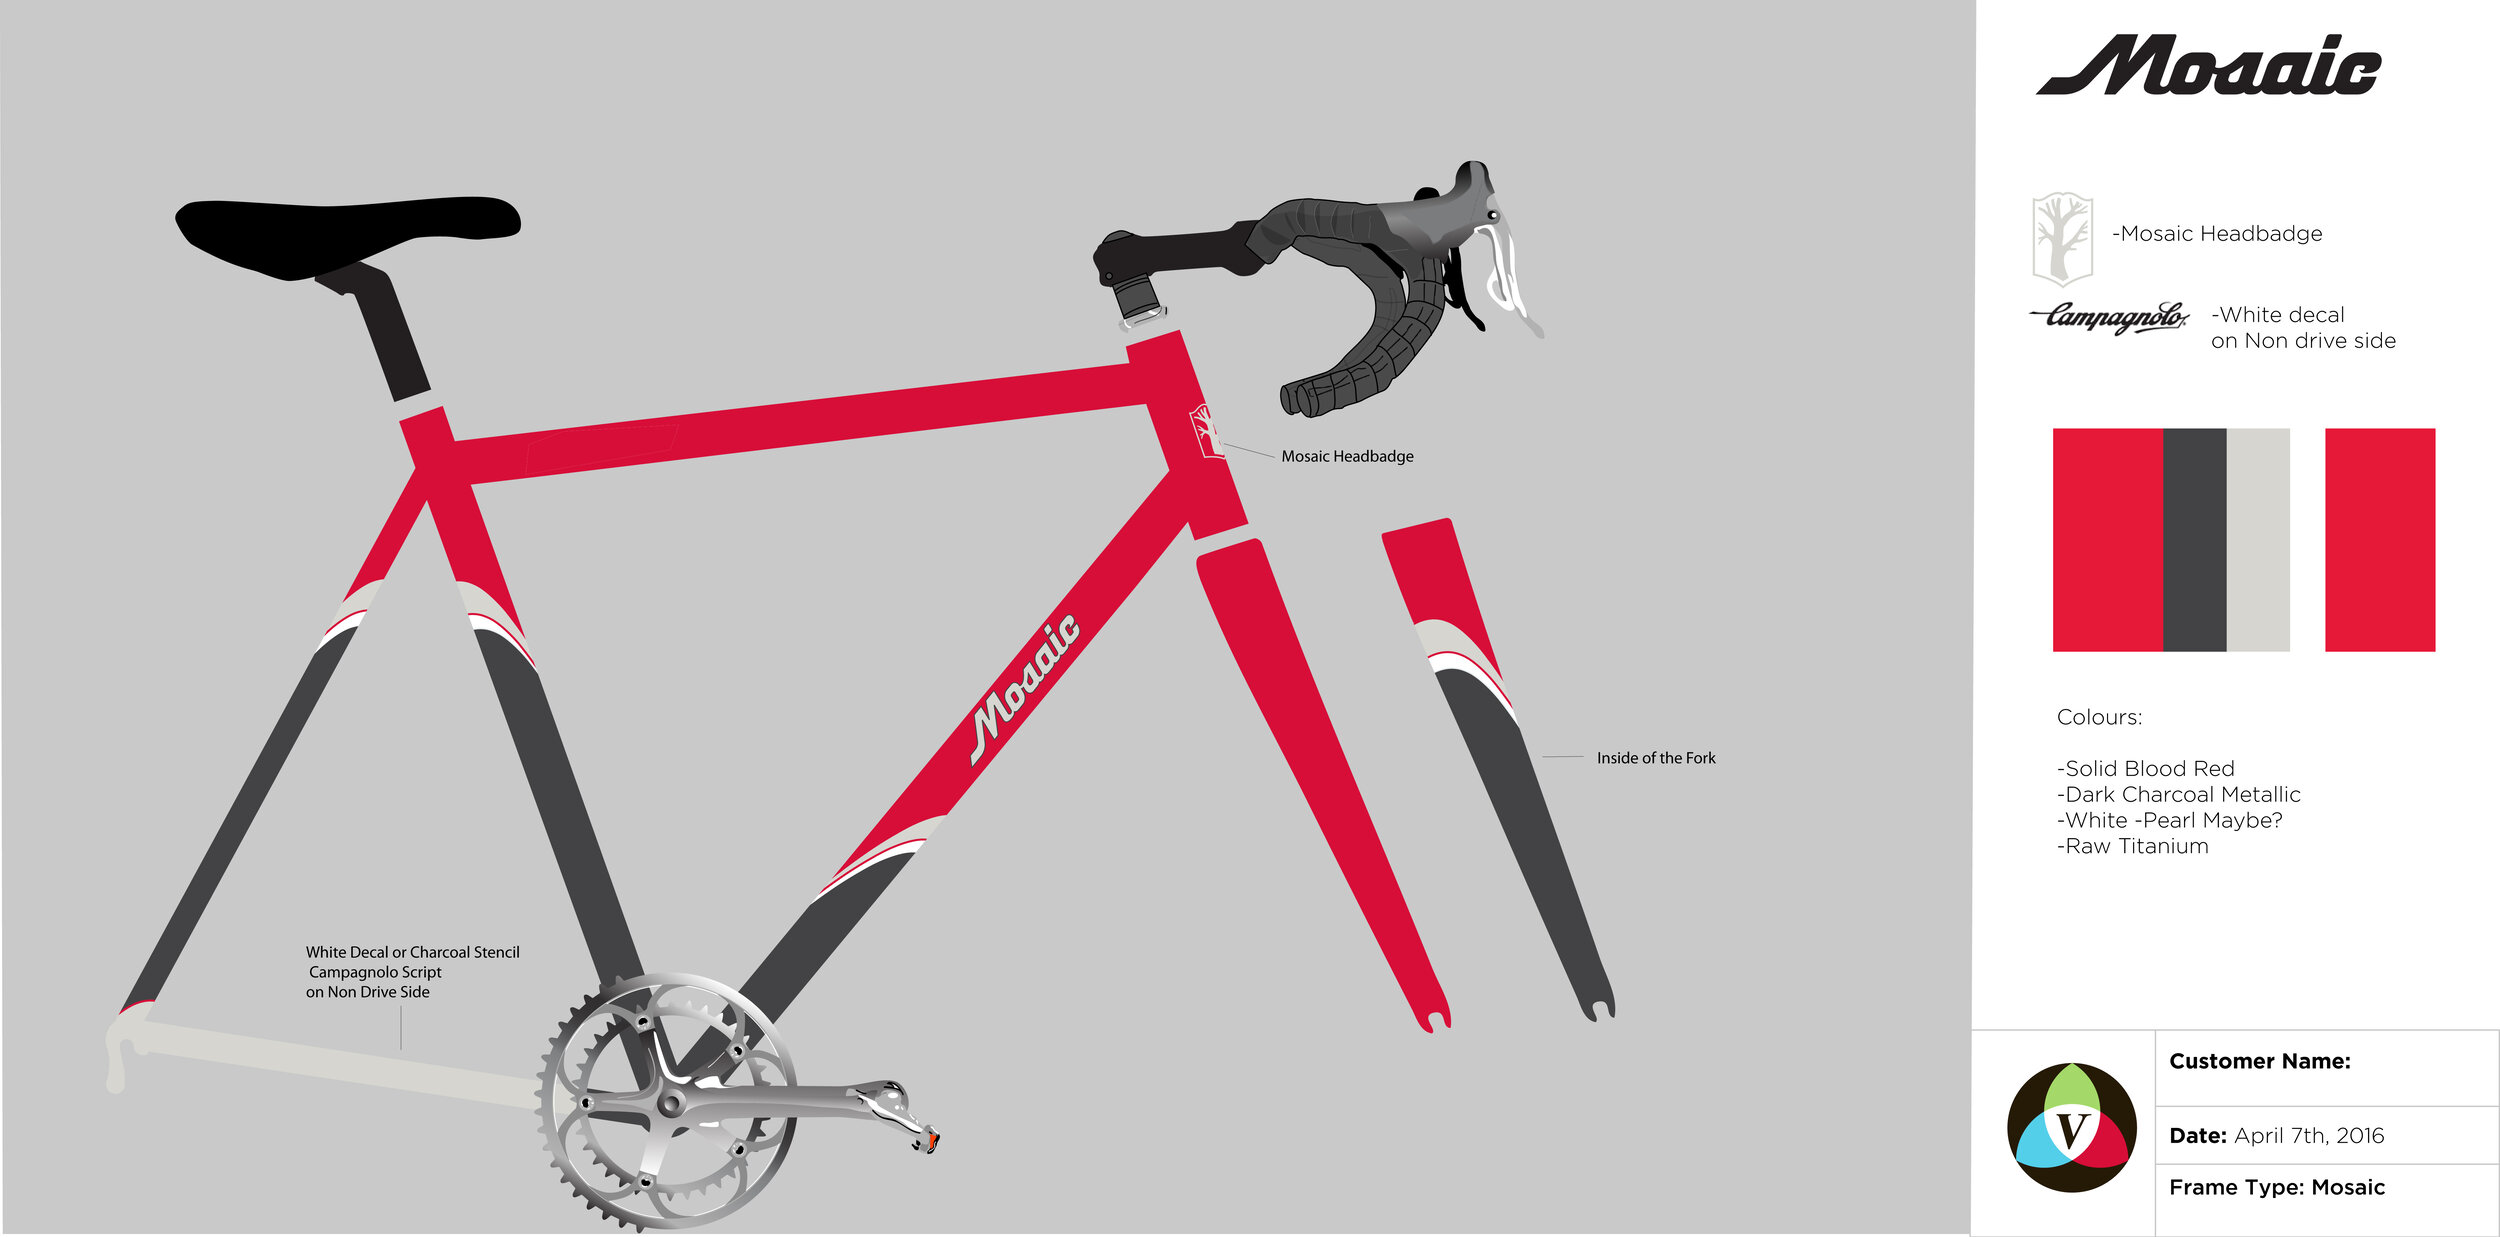
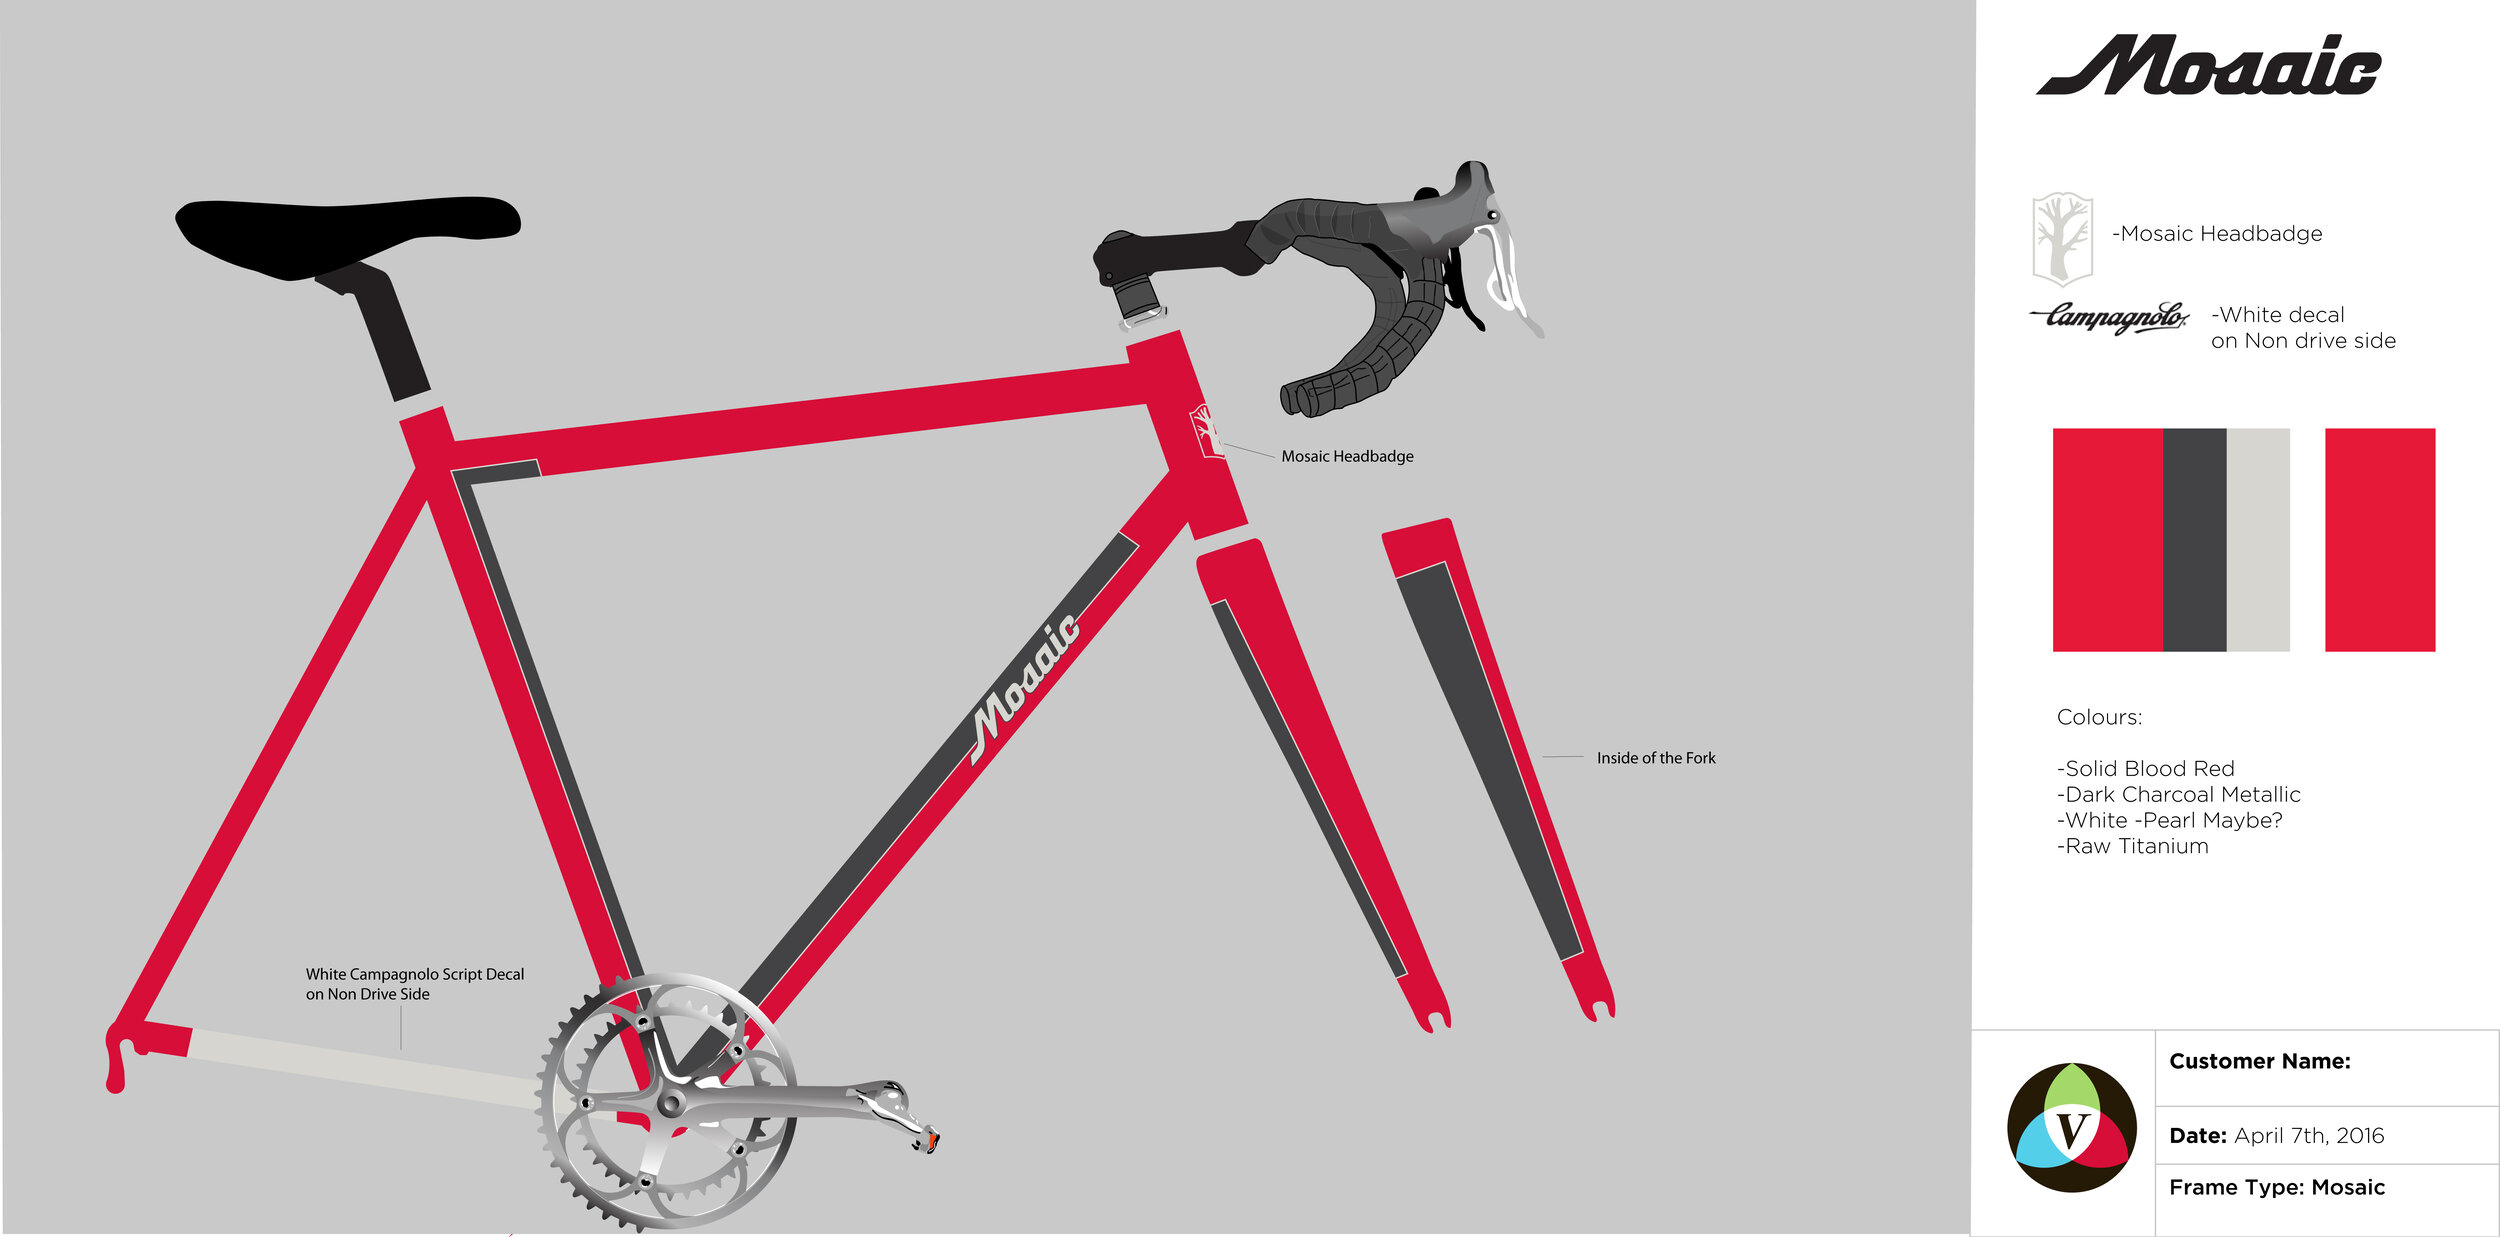

A gallery starting with design inspiration from the customer and finishing with a final design iteration.
Narrowing down the initial design is a conversation.
The initial design is a way for Suzanne and the customer to get on the same page. You tell us what you like and don’t like about what you see, and based on your feedback, we create two to three alterations. Together, we start to fine tune the small details, aiming to have the majority of the design details sorted in a final design about two weeks out from the paint date. You can check out our previous blog post “Jonathan's Custom OPEN UPPER” to get a sense of how that conversation can go. Again, we like e-mail for this back and forth so that we can reference what you said you liked (or didn’t like) as the design evolves.
(A note on colour: Because they’re very difficult to communicate through an e-mailed drawing, we don’t render metallics, pearls, or candies in our design mock-ups. Instead, we use images of paint on cars or bikes to closely approximate the shade, hue and feel of a colour. But more on colour later.)

Our work space.
Step 4. Final details & frame delivery
At this point, we are about two weeks out from starting on paint. We probably have a few final details left to nail down, like the placement and sizing of specific graphics, and finalizing colour. For local customers, this conversation is usually easiest (and more fun) to do in person in front of a wall full of colours. If you are shipping us the frame, we’ll look the bike over once it arrives, and touch base — usually over the phone — to discuss those last little details with the bike in hand.
Finalizing colours
We mentioned earlier that colours can be really hard to represent on a computer screen. So, how are colour choices made?

The colour wall!
We have a huge selection of colour chips and paint samples in our shop that we use to nail down colour for in-person drop offs. For customers shipping projects, it’s a bit trickier. The easiest references for long-distance customers are automotive colour codes — we can cross reference many familiar automotive colours with our PPG mixing system. Pantone codes or other colour chips can also be used for reference, but translating from printed colours to painted colours usually requires some hand-mixing and a bit of guess work. The last option is to e-mail us images of colours you like and we will make an educated decision. This method is pretty common as images are easy to source and give us a good sense of what you’re looking for.
Keep in mind, we are professionals with a trained eye for colour – so trust us, you are in good hands. We are VéloCOLOUR after all – it’s what we do! In our 12 years of business, we have yet to have a customer complain about our colour choices.
Last little details
Now that we have finalized the design and colours, we are basically ready to go! Both the customer and Suzanne are on the same page about the design and execution, and everyone is excited to see the design become a reality.
It’s time for us to receive the bicycle and start prepping for paint.
For in person drop offs, we are open Thursdays and Fridays 11AM-6PM, Saturday 11AM-5PM, or by appointment Monday-Wednesday. Out of town folks are welcome to ship your bike as early as you’d like — we need it at least nine days out from the paint date, but we like to have it earlier if we can. More on shipping here.
Once we have received your frame and parts, everything is checked over to make sure all is in good order. Parts are labeled, numbered, and sorted into the paint queue.

Forks ready for clear coat.
Paint time!
At this point, the customer has handed off all design and bicycle components for us to do our thing. Now it’s time to make it happen. Sometimes folks want to see in-process photos of the frame as it’s being painted, but usually we are too busy painting and designing to photograph and provide updates from start to finish! Customers may see some sneak-peek process shots on social media, or we may send some photos of the final product before return shipping. Either way, we find nothing does the paint justice like seeing it in person.
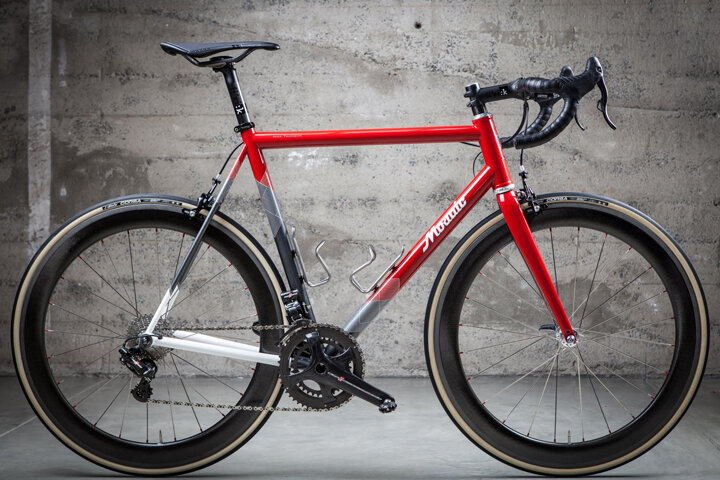
The finished Mosaic. Photo of final build by our friends at Above Category.
Now that you know how we take rough ideas and transform them into a finished design, it’s time for us to get to work. Painting, start to finish. This is where we’ve spent the last decade and a half honing our skills, refining our techniques, and searching for paint finish perfection.